Writing · Jean Silga
How I built a cloud native platform from scratch
Four rented servers, a Kubernetes cluster in under an hour, then the rest of the platform, one Helm chart at a time.
If you read my previous post titled “My journey to master Kubernetes and Cloud Native”, you already know I decided to effectively build a cloud native platform from scratch before taking the CNPE exam. This decision may be rooted in procrastination at its finest: setting an insanely high goal as a precondition to make sure you never reach it…
Bottom line: I decided to build a fully fledged cloud native platform from scratch. Here is how it unfolded.
I started by renting two Virtual Private Servers from Contabo, a German cloud provider. How did I choose the provider? I turned to AI for advice. It gave me five proposals. Contabo was second on the list. I visited their website. The prices were clearly displayed. The proposed services were cleanly explained. The ordering process was straightforward. I settled on them and moved ahead.
I bought two VPS to start with. One with an NVMe drive for the control plane, a second with an SSD for the worker node. Both VPS were up and running, reachable and ready to use within a few minutes. It was a pleasant buying experience.
Then I prepared the control plane to install Kubernetes. I created a dedicated admin account on each node and uploaded my SSH keys so I could log in without typing a password. I went to the official Kubernetes docs and scripted all prerequisites in a Bash file. Then, I wrote an Ansible playbook to run that script on the control plane.
Time for the big moment: kubeadm init.
A few minutes later, I had a Kubernetes control plane staring at me, waiting for a CNI to become ready. I installed Calico and the control plane transitioned to a ready state, waiting for its first worker node.
I raced ahead. I applied a slightly modified version of my init playbook script to the worker node (for instance, no kubectl needed on the worker node). Next, I ran the kubeadm join command. It took a few minutes for the worker node to initialize and join the control plane. And it did.
Now I was looking at a functioning Kubernetes cluster: a control plane and worker node. It felt good. Going from renting the machines to having the Kubernetes cluster up and running took less than an hour.
Before I went on my CNCF Kubernetes certification journey, I wouldn’t have had the courage to even try something like that. I surprised myself. The knowledge I gained through that journey, and the confidence it brought, were starting to show in ways I hadn’t anticipated. And I was just getting started.
I tore down and rebuilt the cluster many times while perfecting the Bash script I used to init the nodes. For instance, I initially forgot to give a custom hostname to the nodes and only noticed it when the cluster was already up and running. Changing the hostname of a running control plane node can be risky. As I was just getting started, I chose to play it safe. I reinitialized the VM and started over. As I had everything scripted, I was back in business in a matter of minutes.
Remember: my goal was to set up a fully fledged cloud native platform. The Kubernetes cluster was just the first building block, the foundation. Like any foundation, it was a prerequisite for the rest. Now I could install the other building blocks. I installed each one with a Helm chart. Here is the whole platform, as described by this post.
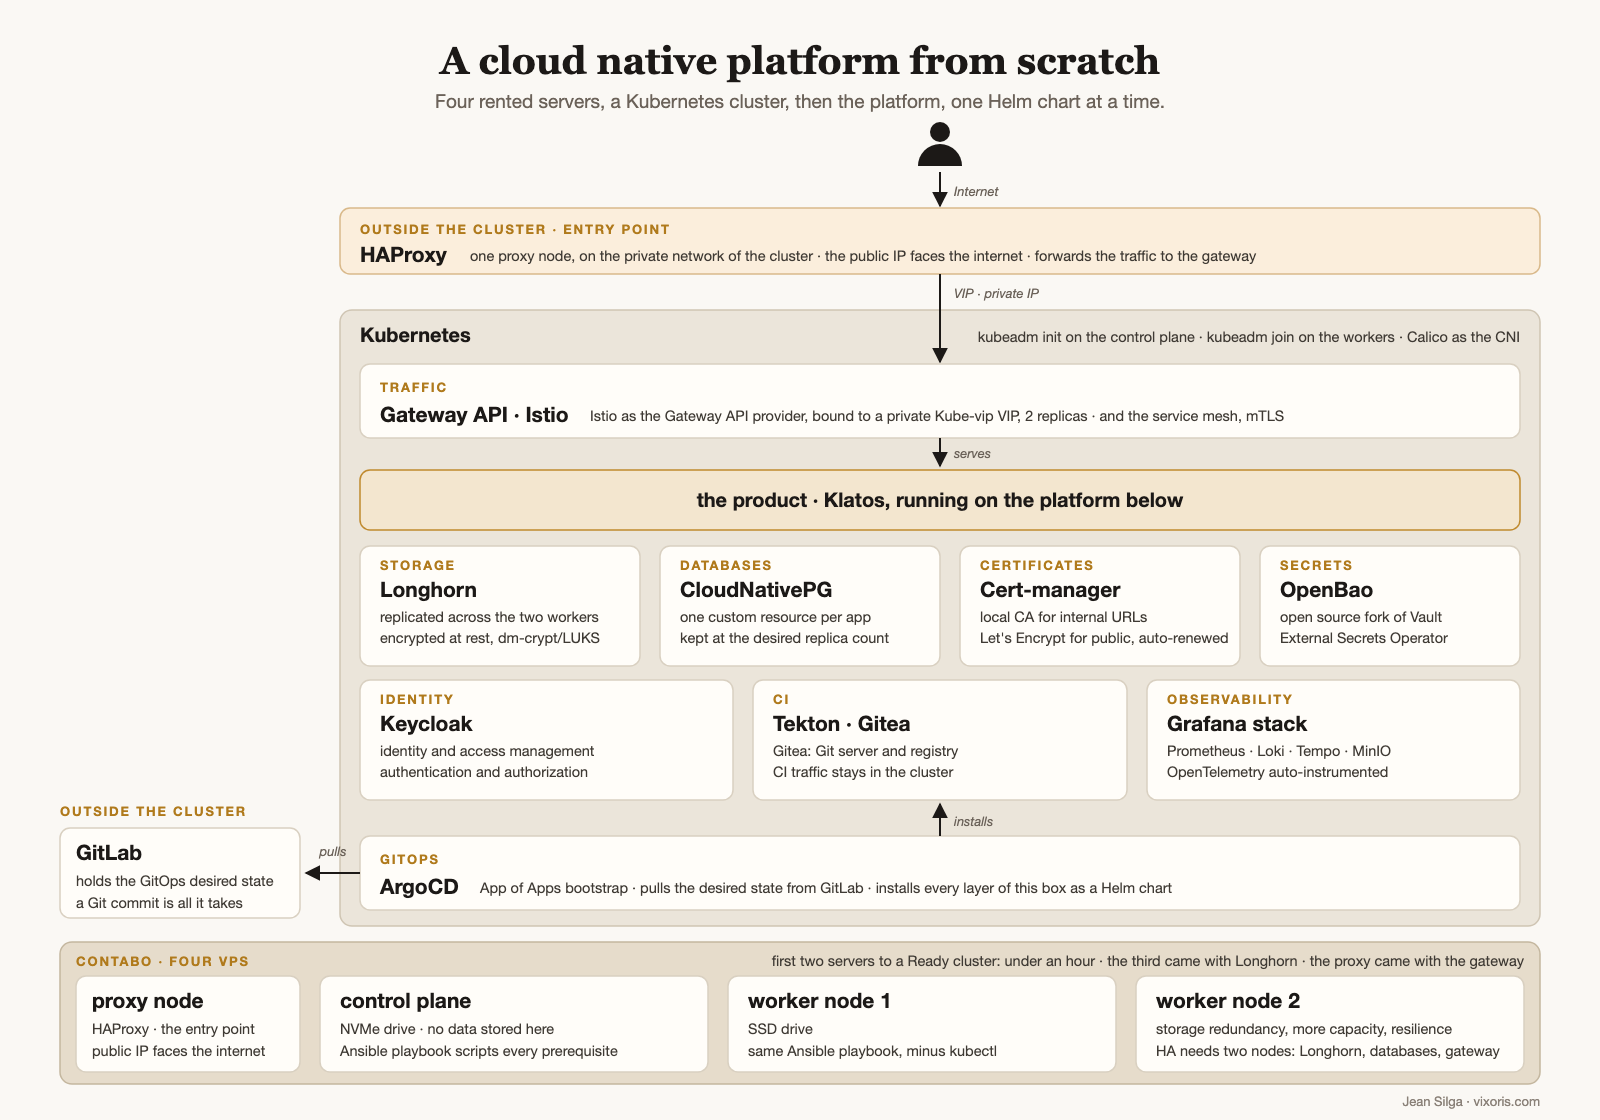
First stop once Kubernetes was up and running: a GitOps tool. As a Certified Argo Project Associate, my natural choice was ArgoCD. I created the Git repo structure in GitLab to host my Argo Apps manifests, then a deploy token for ArgoCD to authenticate with, then a Kubernetes secret carrying that token so ArgoCD could talk to GitLab on its own. I installed ArgoCD from its Helm chart and wrote the file that is the entry point of every later installation on the cluster: the App of Apps bootstrap. That bootstrap file is the seed. From then on, a Git commit is all it takes for ArgoCD to pick something up and install it in the cluster.
Any Kubernetes setup beyond a hello-world use case needs a storage virtualization tool. The basic hostPath and emptyDir volumes are unsuited to real usage. I settled on Longhorn as a storage orchestrator. Storage redundancy is a prerequisite for any sensible storage virtualization, and so I needed at least a second worker node to pair with the one I had. I did not want the control plane involved in storing data in any way. Besides, a second worker node would also bring more capacity and resilience, and make high availability possible.
Overall, I found Longhorn easy to set up, with an attractive benefit/complexity ratio. I also turned on encryption at rest. Longhorn encrypts at the volume level with Linux dm-crypt/LUKS, and I hold the key myself.
For database provisioning, I went with the CloudNativePG operator. It let me create databases for each deployed application with little effort. All I needed to do was create a custom resource with the new database parameters and the operator took care of everything: creating the database, keeping it up, enforcing the desired replica count.
Then came the choice of how to expose services. I settled on using Gateway API over Ingress. Then I picked Istio as a Gateway API provider. I already wanted Istio as a service mesh, mostly for mTLS. Using it as a Gateway API was a bonus. Besides, the setup was straightforward.
The next question to solve was about the IP address the gateway was going to use. Using a static IP of a node was a non-starter for two reasons: first, that would mean the gateway would go down if the node did. And second, I did not want to expose the public IP address of any node of the cluster. I devised a two-step solution. First, I used the Kube-vip utility to set up a private Virtual IP Address that can be moved to any of the cluster nodes dynamically. That way, that VIP stays functional as long as there is a healthy node in the cluster. I assigned that VIP to the gateway. Second, I set up a proxy node outside the cluster to serve as the entry point. That node is powered by HAProxy and is part of the private network of the cluster. It receives the traffic from the internet and then forwards it to the gateway using the VIP.
Next, certificate management. Cert-manager was the obvious choice, and I went with it. My first use was to issue a local Certificate Authority for my internal URLs. The second was more interesting: I connected it to Let’s Encrypt, and valid certificates for my public URLs are now generated on the fly. Renewal is also automatic. It took me a few tries, but I got it working.
Next, I needed a vault for secrets. I considered HashiCorp Vault, but eventually settled on OpenBao, an open source fork that appeared when HashiCorp changed its licensing terms. To get the secrets from OpenBao into the Kubernetes cluster, I used the External Secrets Operator.
Up next: Continuous Integration. The CNCF promotes Tekton for this, so I gave it a try. The tool is complex to set up. I struggled with it at the beginning. It took me some time just to understand how many components Tekton has and what each one does. I finally got it up and running. I was glad later that I stuck with it. It was worth the trouble. Now I needed to connect it with a source code repository to test it.
That’s when I thought: Tekton runs entirely inside the Kubernetes cluster. It can pull source code from any Git repository and push artifacts to any registry. But what if it pulled the code from inside the cluster and pushed artifacts to a registry inside the cluster too? All CI traffic would stay inside the cluster.
I looked around and Gitea was a good fit: it is a Git server and a container registry in one, it is cloud native and light on resource consumption. Gitea it was.
Then came Identity and Access Management. I needed to settle on how to handle authentication and authorization. That one was easy. I have been working with Keycloak since 2019. No debate.
Observability was on my list too. I wanted to know, at any time, what was going on with anything I deployed, what experience users were having, and to be able to investigate quickly when something went wrong. I went for all three kinds of telemetry data: logs, metrics and traces. I settled on the full Grafana stack and instrumented my apps with OpenTelemetry auto-instrumentation to get traces. Prometheus holds the metrics. Loki and Tempo are the backends for logs and traces, with MinIO as the storage behind both.
This is pretty much it. It was quite a ride, instructive and enjoyable. One year ago, I wouldn’t have had the courage to take on such a side project. One thing made it possible: the confidence I built through the CNCF certifications.
Once you build such a platform, the natural thing is to find something to deploy on it. As I wrote last time, I had a three-month period at the start of 2026 when I wasn’t on a job. To keep track of how I was spending my days, I built an Excel file with a list of daily habits I wanted to hold: physical exercise, meaningful learning, digital restraint, sleep and wake-up hours, journaling, a walk outside, meditation, and so on. I started this file to have an accurate record of how my days were going, instead of relying on gut feeling.
Later, while I was building my cloud native platform, an idea started forming: what if I turned that Excel file into a real app, deployed it on my platform, and shared it with the world? The idea was sensible enough that I decided to give it a try. I had been longing to build an app for some time anyway.
Before, I had been hiding behind two excuses: building was expensive, and I couldn’t come up with an idea I thought was worth the trouble. Both excuses were now a thing of the past, for two reasons. AI had significantly lowered the cost of building. And I had more than an idea: I had something tangible, an Excel file I used every day, and knew was worth the trouble.
And one extra motivation, the icing on the cake: a brand-new, fully fledged cloud native platform ready to host the app.
What comes next is a story for another day.
Update, September 20, 2026. I have since published the configuration behind this platform as a public repository. It is a sanitized snapshot of the GitOps repository ArgoCD deploys from: the App of Apps bootstrap, the Helm values for every component, the Ansible playbooks and the kubeadm scripts, all in one place. Every secret, hostname and IP address is replaced with a placeholder, so it is a reference to read and adapt, not a distribution to deploy as is. If you would rather see how the pieces fit together than read about it: https://gitlab.com/jeansilga-public/cloud-native-platform
That app is Klatos — a habit app that turns small daily steps into a changed year. It runs on the platform in this post, and it is the first product from Vixoris.
Learn more about Klatos →